Monday, September 29, 2014

Arcane Lacquer: The Power, The Passion


Hey everyone,

I recently placed an order at NorwayNails.com which is a great site for German girls to buy some indies, as they deliver here and the costs for shipping are not too high :)
I decided to try some indies I hadn't tried before and amongst some others chose this purple glitter beauty by Arcane Lacquer. I'm really happy I picked this one, as it is an amazing and sparkly polish that just looks fantastic on the nails! It's called The Power, The Passion and this is two coats topped with HKgirlTopcoat by GlistenAndGlow.
It is a purple base filled with tons of green, purple and dark blue glitter that come together beautifully. I needed two coats for full opacity and the topcoat smoothes it all over and gives it the perfect glossy finish so it can show all its beauty!


Arcane Lacquer: The Power, The Passion


Macro shot of Arcane Lacquer The Power, The Passion


Bottle shot of Arcane Lacquer The Power, The Passion


Arcane Lacquer: The Power, The Passion


Hope you enjoyed these pictures of my pick from Arcane Lacquer, visit NorwayNails.com or Arcane Lacquer's Etsy Store to have a look at their range of polishes. 

Lots of Love,
Glittr

Tuesday, September 23, 2014

Review: Laquerlicious polishes


Hey everyone,

I have some swatches of a bunch of awesome polishes by Laquerlicious for you today! I was so excited to try some of Michelle's beautiful creations, so I ordered four polishes from her new Fall Collection as well as one polish I have been eyeing for a while now.. ;) But I'll get right to the swatches because that's what were all here for, right?!


Laquerlicious Indian Summer


First up is this gorgeous purple glitter called Indian Summer! I love everything about this one, from the colour to the depth to the formula, this was definitely a good choice! It's a purple base filled with all kinds of multicoloured glitters and it sparkles like mad! Shown are two coats topped with HKgirl Topcoat by GlistenAndGlow. This is one of my favourites out of the four polishes I got from the Fall collection!

Up close bottle shot of Laquerlicious Indian Summer

Macro Shot of Laquerlicious Indian Summer

Laquerlicious Indian Summer


Laquerlicious Days Of Fall

Next up is Days Of Fall, which is a beautiful grey base with very fine purple and turquoise glitters inside. This one too is a really pretty, classy polish that looks beautiful in two coats, topped with HKgirl Topcoat. I think this is a beautiful colour for fall, just to wear on its own!


Up close bottle shot of Laquerlicious Days Of Fall


Macro shot of Laquerlicious Days Of Fall


Laquerlicious Days Of Fall


Laquerlicious October Fest


This is October Fest, a dark grey filled with blue, purple and silver glitter. It looks much darker and more blue on the nails than in the bottle, but it's still a really pretty one. The formula was a tiny bit hard to work with, as the glitters made it a little bit chunky. Still it only took two coats for opacity and it's a really pretty dark polish with glittery accents, perfect for fall. This was also topped with HKgirl Topcoat.


Up close bottle shot of Laquerlicious October Fest

Macro shot of Laquerlicious October Fest

Laquerlicious October Fest


Laquerlicious Sweet September

Sweet September is a gorgeous greyish/purple almost duo chrome polish with loads of purple shimmer in it! Also, application was a bit tricky here as it was a little bit goopy, but it was totally worth this amazing finish! It shifts beautifully in the light and is another one of my faves from this collection!

Up close bottle shot of Laquerlicious Sweet September


Macro shot of Laquerlicious Sweet September

 Laquerlicious Sweet September


Laquerlicious Behind The Scenes

Ok, I have been eyeing Behind The Scenes for a while now, I've seen a few other swatches and thought this looked like an amazing polish - and it totally is!! Everyone should own this insanely dotty polish, it's the coolest effect ever! The clear base is filled with so many little glitters that they almost make a complete polish (if you know what I mean), it is just mind-boggling even looking at the bottle! Application was ok, as I said it's packed with so much glitter it would have surprised me if it had slid onto my nail perfectly. It still works awesome though and I didn't have to fight putting it on to completely cover my nail. I did two coats and then filled out some spaces on the third go, mostly around my cuticles and at the sides of my nail. I finished off with my HKgirl Topcoat and BAM - awesomeness overload!! This has for sure gone right to the top of my list of really unique polishes in my collection, I love it!!


Up close bottle shot of Laquerlicious Behind The Scenes

Macro shot of Laquerlicious Behind The Scenes


Laquerlicious Behind The Scenes


I hope you enjoyed my little review, I certainly enjoyed trying this awesome Indie brand Laquerlicious and I will certainly be buying so more of these! :) Check out Michelle's store here and head over to show her some love on Instagram too -> @creativenailchick

Lots Of Love,
Glittr

Tuesday, September 2, 2014

Guest Post for PaulinasPassions: Purple and Gold Leopard Print

**********My Guest Post For PaulinasPassions**********

Hey everyone,

I've been posting pictures of my nails on my IG account @Glittr for over a year now and started my little Blog LiveLoveGlittr about 6 months ago. A few weeks back the lovely Paulina asked me to do a guest post on her blog and I was thrilled! This is my very first guest post and I am honoured to be on Paulina's blog, thank you so much for having me :)

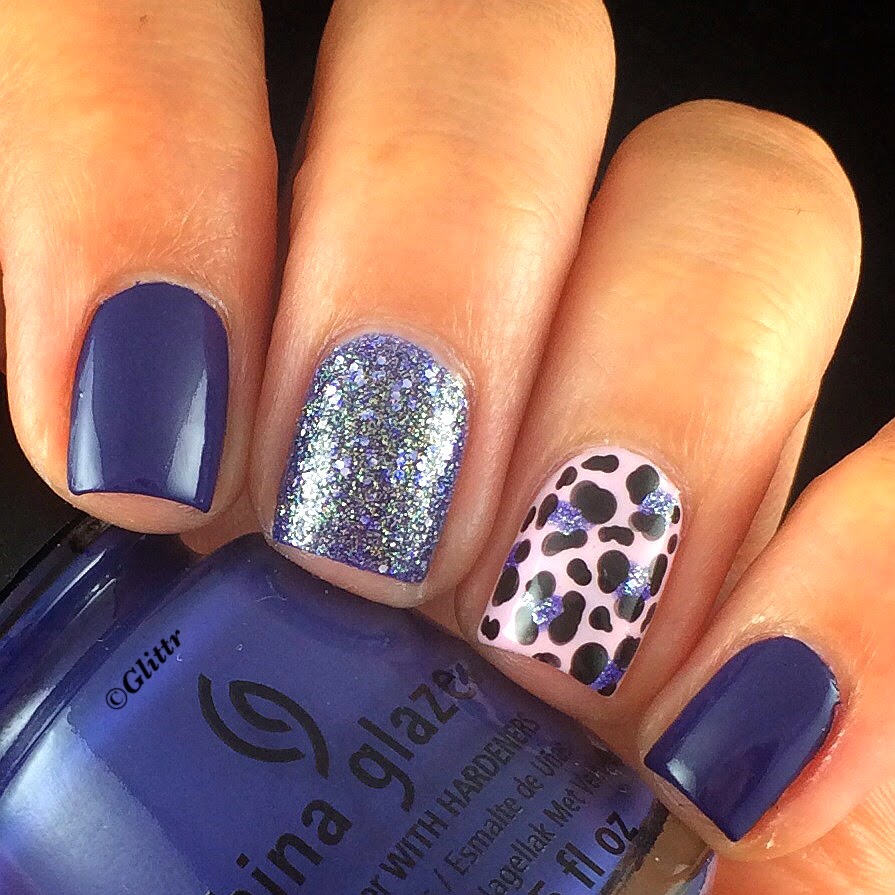
When I was thinking about what to do for this special blogpost, I thought about what I do best: the simple things! My personal style is pretty classic and basic with the odd statement piece or pop of colour. And this reflects on my nails too! I love doing more intricate designs but in every day life, I keep my nails pretty basic so they can go with anything I feel like wearing. Also, the simple designs are the ones my followers on Instagram seem to love most too, so I decided on doing a very easy leopard print and glitter accent nail tutorial for the look pictured below - so here it is :)


First up, I chose my colours. In this case I went for ChinaGlaze Lotus Begin and I'm Not Lion for my main colours. I used OPI Black Onyx and Alpine Snow for the black and white parts.

I made a little pictorial on how I do my leopard print, it's really easy and anyone can do it, you can't really do much wrong! :)


I painted my accent nail two coates of white, if you have a really nice opaque white you can get away with one coat as well. Also, it doesn't matter too much if there are tiny streaks in the white base, as you can cover up any flaws with the leopard print!

I then made some random blobs with ChinaGlaze I'm Not Lion and a dotting tool. They can be a bit squiggly, you don't have to make any perfect round dots here. Of course you can use anything similar to a dotting tool, like the end of a bobby pin for example.

Next I took my dotting tool and black polish and drew some squiggly lines around the gold blobs. Some say they do C-shapes, but I tend to do three lines around each dot, I just like the way it looks! Then I fill in any blank spaces between the leopard prints with more black squiggles to even the pattern out. Voila!

I put on CG I'm not Lion on my ring finger and painted all the other nails with Lotus Begin. I really like this very simple look with two pretty accent nails that catch the eye. 

I've also done these simple designs with flowers, they are just as pretty and make a nice, classic and pretty manicure. Also flowers are a great alternative if you're not into leopard print ;)

I hope you liked my little tutorial on the cute and simple nails! Thanks again Paulina for having me! :)

Check out my blog on LiveLoveGlittr.blogspot.de for more mani ideas, reviews and other nail nonsense!

Lots of Love,
Glittr

Monday, August 25, 2014

August New In: Nailpolish

Hey everyone,

over the past weeks I've accumulated a few new polishes for my collection. Sometimes I'm really good over a certain period of time and don't buy any polishes at all, instead if I see one I like I put it on a "to buy" list in my phone. Also, this helps with collecting some polishes that you might want to buy from one site but don't want to waste the shipping for just one, so I wait until I have a few more I want and get a bigger order :)

I'll show you the newest ones that I have recently added to my collection, starting with these two beautiful OPIs!


Most of the time, when a new collection comes out by one of the bigger brands, I lean back and look at all the swatches on Instagram first. With the last few collections, there were only few polishes that I really wanted, most of the time I thought I already had ones very similar in my collection, so I didn't really need them. Yeah, sometimes I'm reasonable like that ;) 

But now and again, a certain polish from a collection immediately catches my eye and I need it asap, this happened with OPI Do You Have This Color In Stock-Holm? from the Nordic Collection. It's a gorgeous deep purple and perfect for fall! I do have a purple by Kiko in my collection that is very similar, unfortunately I've had it for ages and it's gone all gloopy so I will be kicking it out, especially now I have this beautiful replacement :) 

OPI I Just Can't Cope-acabana wasn't one of the colours I really wanted when the OPI Brazil collection came out. I immediately bought all the nude shades but yellow normally isn't a colour I go for and hardly ever wear, it's just not me. But after contemplating it for a while, I noticed I didn't have one single nice yellow in my whole collection, and what kind of nail polish junkie would I be if I didn't?! So I got this one and it's a gorgeous shade of yellow that even I can pull off! Ok, summer is over, but still it's great for nail art and there is always next years summer to rock this awesome shade, right? 


Normally every single collection ChinaGlaze releases, I immediately want EVERY SINGLE ONE of them! But the recent Off Shore Collection didn't really have too many shades I was excited about. Being a girly girl and pink being my fave shade of polish ever, of course I needed these two: ChinaGlaze Feel The Breeze and Float On are two pretty pinks that I can see myself wearing a lot! :) They aren't too special and I probably have similar shades in my collection, but I felt I needed them anyway, pink polish is just my soft spot..


Now when Essie came out with their Haute In The Heat collection, Urban Jungle was a polish I knew I needed in my life!! Besides pink, I'm a sucker for nudes and this one is just to die for! Sadly, it took me forever as I wasn't the only one who felt this way about Urban Jungle... In the end I had to order it online, after stalking all the stores and repeatedly being disappointed as they were all sold out - for obvious reasons. But when I finally had it, it was love at first sight and this colour is totally worth the hype, at least in my opinion.
Not one single one of the other polishes in this collection tickled my fancy, they all looked like dupes for colours Essie had already released! 


So these three babies here show that I am totally obsessed with glitters at the moment.. But you know, there can never be enough glitter I say!

First one up is OPI This Gown Needs A Crown from the Miss Universe Collection. It's a beautiful silver polish and I've been looking all over for one. I've been using Essie No Place Like Chrome so far, but it's a chrome and doesn't always fit what I have in mind for a mani. Still haven't gotten around to trying the OPI, but I will for sure let you know when I do! I could see this being a lovely match for OPI Do You Have This Color In Stock-Holm... don't you think? ;)

Next is ChinaGlaze I'm Not Lion - this has been a lemming of mine FOREVER! I finally found it on Amazon the other day and can't wait to use it! Also I need to compare it to Essie Beyond Cozy, another glitter favourite of mine, which is unfortunately getting really gloopy and hard to work with.. but yay, I finally have it!! :)

Last but most definitely not least is OPI It's Frosty Outside. I didn't buy this one when it came out, because I have Isadora Diamond Crush and judging from the swatches I saw online, they are dupes for each other. But my Diamond Crush was so well loved I'm nearing the end of it and I couldn't imagine my life without a silver glitter liquid sand polish, so I thought I would go for the OPI version and see how I like it! 


I hope you enjoyed my New In post, I think I'll do these now and again, as you know, I do buy a lot of polish... ;)

Lots of Love,
Glittr


Saturday, August 23, 2014

Review: Isadora Peel Off Base Coat

Hey everyone,

long time no proper blogpost - I'm sorry but I was really busy and didn't want to write half-heartedly but rather make the effort for a proper blogpost. And now I've tried something new, I thought I'd give you a little review on the Isadora Peel Off Base Coat.


Let me start with saying that I think Isadora is a very nice brand and I really fell for their sugar crush collection last year. They are available quite a lot here in Germany, though I always wonder about the small range of colours they have.. maybe the stores don't carry all of them, online they have a far bigger selection of colours and finishes.

The bottles are pretty small, so they fit less polish than other brands. They are not exactly cheap though, one bottle retails for €8,99 - which is about $12.

Still, they have some very pretty colours and I applaude them because they recently came out with a Peel Off Basecoat! Out of all the brands you can buy in stores in Germany, they are the first (as far as I know). I know OPI has one too, but that is just completely unavailable to me. So I was pretty thrilled and thought I'd give it a try, the idea of just peeling off glitter polish in one go is quite appealing to me, much more than the thought of having to use the good old cotton-balls-soaked-in-acetone-covered-with-foil-method that dries out your cuticles like something awful!


The Peel Off Base looks like liquid glue in a polish bottle, it's white and dries clear. The instructions say to wait 5 minutes until the base is (fully) dry, you just need one thin coat.
You can then put normal nail polish on top and then apply your topcoat over that. You can't see that a different basecoat was used at all, it looks like a "normal manicure" :)

I tried it with a liquid sand glitter polish from Julie G. (sadly with no name) first, I only used it for the middle finger in this mani (the rest was added later, I wasn't sure where I was going with this so the blue on the pointer and ringfinger just kind of happened later on). You can't see anything under or around the glitter on the nail as the base dries clear, so it looks like you've used a normal base coat. The great thing is, when it's all dry you can just pick the polish at any edge and can easily peel off the polish in one go! 
I tend to not be able to put the base onto the entire nail, there are always thin lines at the side or the cuticle where the base didn't quite reach, so when you put the coloured polish over it you might paint tiny parts of your nail that you later have to remove with polish remover, but that is nothing compared to having to do the whole nail!


This is a massive plus in my book, I could not be bothered to swatch if I had to take off all the polish with acetone or nailpolish remover every damn time, I just don't know how all the girls do it??! You must be crazy moisturizer freaks, trying to save your skin from drying and dying?! I hope you guys know I'm kidding, I truly admire all the lovely girls that swatch polishes, how else would I be able to see what a polish looks like on the nails instead of the bottle! But I seriously can't believe you put it on, remove it with acetone/nailpolish remover and do that a few times in a row. Or am I not in on some major swatching secret??!

Anyway, for swatching this Peel Off Base Coat is a dream come true. In real life, I didn't have the best experience.

It was late and I had a dinner with my colleagues from work the next night which I was going to head to straight from work, so I thought I'd just slap on a color and be done with it. As I was sure I wasn't going to keep a plain color on for long and also wanted to put the longevity of the Peel Off Base to the test, I put it on and painted my nails two coats of Essie Forever Yummy (classic red) and finished off with my trusty HKgirlTopcoat from GlistenAndGlow. This was at about 10:30 p.m.
The next morning at work I was washing out a mug in the kitchen of my office and suddenly has something else in my hand, after a moments hesitation I recognized it as a coat of nailpolish that had come off of my nail - in one, perfect bit.
I don't know about you, but I can't really have one nail (also, the pointer finger on my dominant hand) missing a coat of nailpolish and the others being red.. so I took off all the polish off my nails. Of course it was super easy! But as mentioned above, I did have a few tiny lines of red at the side of my nails or at my cuticles, where I hadn't quite reached with the base coat.
So now I not only had bare nails, but with red linings around. Really attractive, right? I didn't have anything with the me take off the leftover red (I had just cleaned out my makeup bag in my purse and gotten rid of some nail polish remover wipes because they had become really gross over the time) and so I had to endure the evening without a) any polish on and b) red lines around them.
I slathered my nails in my favourite nail oil, the Bliss Kiss Pure NailOil and then cleaned up my nails when I came home that night.

So my verdict for the Isadora peel off base coat: perfect for swatching, not the best for daily use. But still I am in love, because now I can do a lot more swatching without giving my nails and skin around them a hard time, which I love! I already bought a back up bottle too.. ;)

If you have any questions or comments, drop them below :)

Lots of Love,
Glittr


Thursday, August 21, 2014

Nailart: Random black and bright Dotticure


Hey everyone, 

I did this little random dotticure the other day and I am IN LOVE! I love the bright colours on the black base and the whole look of this! :) I used some of my favourite colours by ChinaGlaze, Bottoms Up (bottle shown above) and At Vase Value.


Bottle shown: ChinaGlaze At Vase Value


Bottoms Up is my absolute favourite pink neon, it just pops so much and fits my skin tone really well! It also was the perfect match for At Vase Value, a very light blue that leans on the turquoise side - both are so pigmented that I didn't even have to use a white base to make the colors show up over the black polish! Both are some of my overall ChinaGlaze favourites! 


Bottle shown: OPI Black Onyx


The black polish is OPI Black Onyx. I think the colours really pop on the dark base, I am just overall in love with this dotticure (in case you haven't noticed ;)

Lots of Love,
Glittr

Sunday, July 20, 2014

Review: ColorClub Seven Deadly Sins Collection


Hey everyone,

ColorClub recently came out with their new Seven Deadly Sins Collection, which are a bunch of gorgeous matte glitters! I have the mini pack with four of these beauties to show you today!


Color Club Under Your Spell

First up is Under Your Spell, which is a gorgeous blue and purple glitter with a green shimmer to it. It's really pretty and for a glitter packed polish application was really good too! (glitters can sometimes be a real pain to work with..) Shown are two coats, it has lots of fine glitter and a few bigger glitters in it like a liquid sand polish. It dries semi-matte and doesn't need a topcoat, I didn't even put one on to try because I loved the look of it on its own so much :)


All in all, it's a very pretty glitter and makes for a great glitter accent nail! Look at that close up!! *drool*


Color Club You're So Vain

The next polish I have is called You're So Vain and it's a dark red, black, purple-ish glitter. The consistency wasn't the best, it was pretty gloopy and hard to work with, but it was kinda worth it ;) This one dries very matte, I put on two coats. It's completely packed with glitter, maybe that is why application was a bit tricky. Nonetheless it's a gorgeous polish!


In the last picture you can see the polish with one coat of Rica's Glossy Glam topcoat. It makes the glitter shimmer a bit more, so you can see how beautiful it really is!


Color Club Dirty Money

This baby is called Dirty Money and it's sooo pretty!! Again this is two coats, no topcoat. Just plain gorgeous gold beautifulness! Application was great, very smooth and easy. I really don't have anything more to add! :)


It's a bit like liquid gold in a bottle - literally! It dries matte, but still sparkles like billi-o. So pretty!


Color Club Friends With Benefts

The last polish in the mini pack might just be my favourite: Friends With Benefits (love that name too!) is a metallic purple glitter that also dries pretty matte, but also looks awesome with a shiny topcoat.  The formula is a tiny bit on the tricky side, although not as complicated to work with as You're So Vain. It's almost a bit like a holo, because it has so much tiny glitter in it that it reflects like crazy! 


There are three more colours to the Color Club Seven Deadly Sins Collection, but I only had the mini pack with four to show you today. I think they are a great compilation of the collex, the other three colours actually don't really strike me as my kind of colours, so I am really happy with the pretties in the mini set! 
I hope you liked my little review, I put some pics of two manis I did using some of the glitters down below. 

Lots of Love,
Glittr


ColorClub glitter used: Under Your Spell

ColorClub glitter used: Friends With Benefits